 How to Create Custom Ringtones for an iPhone
Thursday, 29th November 2007, 07:11 pm
How to create custom ringtones for your 1.1.2 or higher iPhone using only iTunes.
Using iTunes 7.5 or higher you are able to create custom ringtones for your 1.1.2 or higher iPhone. This method may not work after a firmware update but for now everything works great.
Follow these instructions to make your ringtone and put it on the iPhone.
Step One
Open iTunes by clicking its icon in the dock. ![1581[1]](http://iphone.pocitac.com/images/JaknavlastnvyzvnnproiPhon_D041/15811.png)
Step Two
Check to see if you have a Ringtones category within your Library. You will find this on the left side of the iTunes window. If you DO have Ringtone category then you can skip to Step Four. ![1582[1]](http://iphone.pocitac.com/images/JaknavlastnvyzvnnproiPhon_D041/15821.png)
Step Three
Quit iTunes then open a new Finder window by clicking its icon in the dock. ![1583[1]](http://iphone.pocitac.com/images/JaknavlastnvyzvnnproiPhon_D041/15831.png)
Select Go To Folder… from the Finder’s Go menu. ![1584[1]](http://iphone.pocitac.com/images/JaknavlastnvyzvnnproiPhon_D041/15841.png)
A popup window will appear. Type ~/Music/iTunes/iTunes Music/ into the entryfield and click the Go button. ![]()
Select New Folder from the File menu. ![1586[1]](http://iphone.pocitac.com/images/JaknavlastnvyzvnnproiPhon_D041/15861.png)
This will create a new folder in the Finder window. Select the folder and press the Enter key. This will allow you to rename the folder. Rename the new folder to Ringtones. 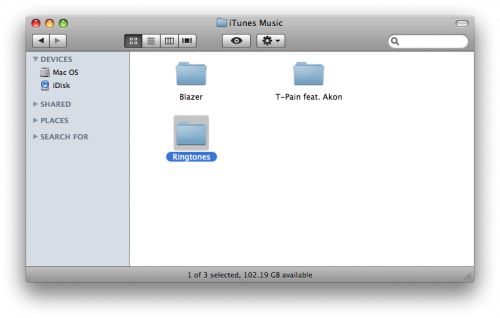
You can now restart iTunes. You should now have a Ringtones category on the left!
Step Four
Select a song from your library that you would like to use as a ringtone. 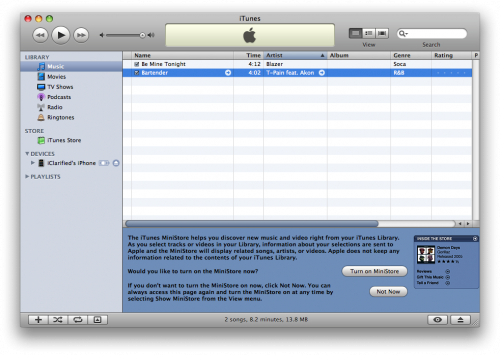
Hold down Control on the keyboard and click the song. From the popup menu select Get Info. ![1592[1]](http://iphone.pocitac.com/images/JaknavlastnvyzvnnproiPhon_D041/15921.png)
From the window that appears select the Options tab. Check the box next to Start Time and enter a start time for your ringtone. Check the box next to Stop Time and enter a stop time for your ringtone. NOTE***: The first time i tried this I attempted a ringtone 36 seconds long. It would not sync to my iPhone. I’d recommend you keep your ringtone at around 30 seconds long. 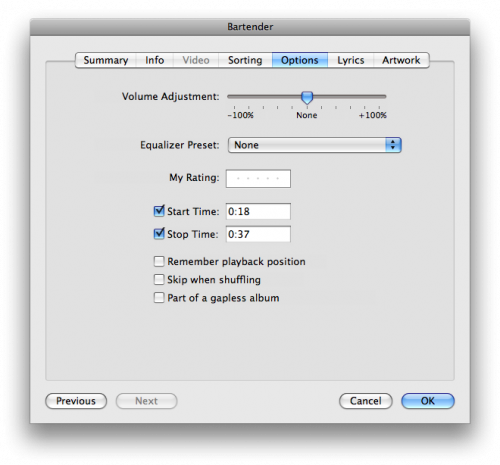
Step Five
Press the play button to test your ringtone and make sure it sounds okay. If it doesn’t you can go back and modify the start and stop time till it does. Once you are satisfied then Control+Click the song and select Convert Selection to AAC from the popup menu. ![1594[1]](http://iphone.pocitac.com/images/JaknavlastnvyzvnnproiPhon_D041/15941.png)
You will notice that a copy of the song appears in your library. This copy is the shortened song to be used as your ringtone. 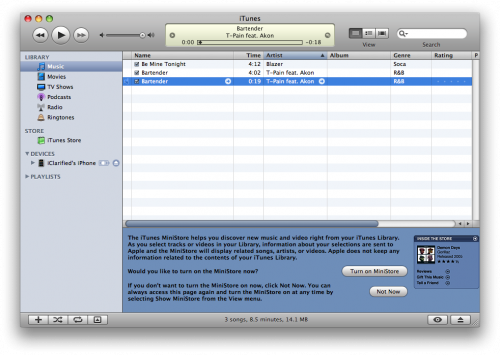
Before you forget go back into the original song’s options and uncheck the Start Time and Stop Time so it will play normally.
Step Six
Drag the newly created track to your Desktop. ![1596[1]](http://iphone.pocitac.com/images/JaknavlastnvyzvnnproiPhon_D041/15961.png)
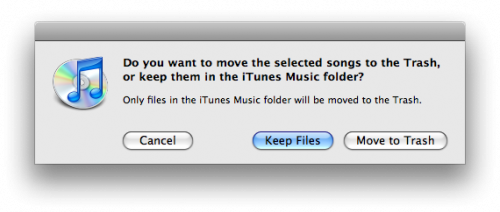
With the newly created track still selected in iTunes press the Delete key on your keyboard. A popup will appear asking to confirm its removal from the library. Click the Remove button. Another popup will appear asking you what to do with the file. Click the Move to Trash button. 
Step Seven
Rename the file you dragged to your desktop to .m4r from .m4a. Do this by selecting the file then pressing the Enter key on your keyboard. ![1597[1]](http://iphone.pocitac.com/images/JaknavlastnvyzvnnproiPhon_D041/15971.png)
Step Eight
Once you have renamed the file on your desktop add it back to iTunes by double clicking on it. You will notice that the track now appears under the Ringtones category in iTunes. 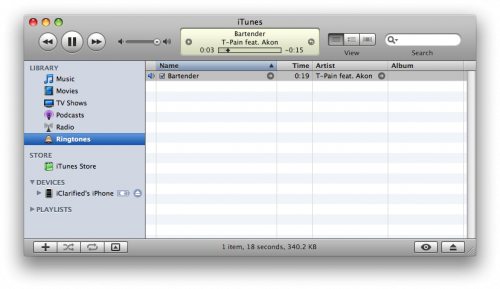
Step Nine
In iTunes select your iPhone from the list of Devices on the left. Then select the Ringtones tab.
Check the box next to Sync Ringtones and select to either sync All Ringtones or to sync only specific ones.
Finally, click the Sync button at the bottom right to sync your newly created ringtone with your iPhone. 
Step Ten
To use your new ringtone with your iPhone select Settings from your iPhone’s springboard. ![1602[1]](http://iphone.pocitac.com/images/JaknavlastnvyzvnnproiPhon_D041/16021.png)
Select Sounds from the Settings menu. ![1603[1]](http://iphone.pocitac.com/images/JaknavlastnvyzvnnproiPhon_D041/16031.png)
Select Ringtone from the Sounds menu. ![1604[1]](http://iphone.pocitac.com/images/JaknavlastnvyzvnnproiPhon_D041/16041.png)
You will see your newly created ringtone under the custom category! Press to select it! ![1605[1]](http://iphone.pocitac.com/images/JaknavlastnvyzvnnproiPhon_D041/16051.png)
