 How to Securely Erase Your iPhone Before Resale
Tuesday, 17th June 2008, 02:06 am
Instructions on how to securely erase your iPhone, iPod touch to prevent the recovery of private data.
These are instructions on how to securely erase your iPhone or iPod touch to prevent the recovery of private data.
 Watch the Video!
For your convenience this tutorial is available in video format also. Click the Watch It button to view the tutorial!
Step One
Launch iTunes by selecting its icon in the dock ![6020[1]](http://iphone.pocitac.com/images/JakbezpensmazatdataziPhonupedprodejem_C3F5/60201.png)
Step Two
Connect your iPhone or iPod touch to the computer then select it from the list of devices on the left. 
Step Three
Click the Restore button in the Summary tab. ![]()
If asked to create a backup click Don’t Back Up 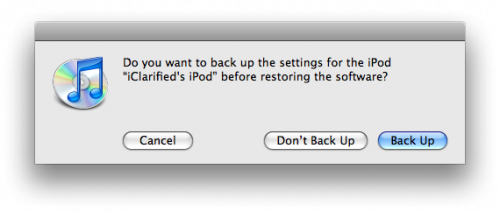
A popup window will appear asking you to confirm the restore. Click the Restore button. 
Once the Restore has complete a window will appear confirming that your iPhone, iPod has been restored to factory settings. Click the OK button. 
Now you will be asked to name your iPhone, iPod touch. Enter a new name then click the Done button. 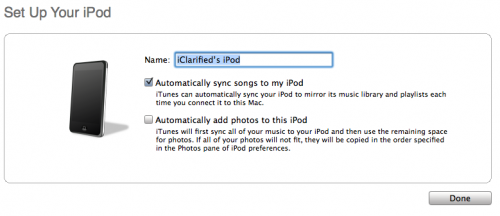
Step Four
Now follow your desired method to jailbreak your iPhone. If you do not have a preferred method then use one of the many detailed on this site!
Windows: http://www.iclarified.com/entry/index.php?enid=849
Mac: http://www.iclarified.com/entry/index.php?enid=847
Step Five
Now you will need to install BSD Subsystem and SSH on your iPhone. You can do this by using these tutorials…
Install BSD Subsystem: http://www.iclarified.com/entry/index.php?enid=687
Install SSH: http://www.iclarified.com/entry/index.php?enid=1349
NOTE***: To make sure SSH connections do not terminate I would suggest setting Auto-Lock to Never in Settings:General:Auto-Lock.
Step Six
Download umount from here and save it to your Desktop.
Step Seven
Open a new Terminal window from your Applications:Utilities folder. ![6028[1]](http://iphone.pocitac.com/images/JakbezpensmazatdataziPhonupedprodejem_C3F5/60281.png)
Step Eight
Enter the following command into your Terminal window:
scp ~/Desktop/umount root@192.168.0.192:/sbin/umount 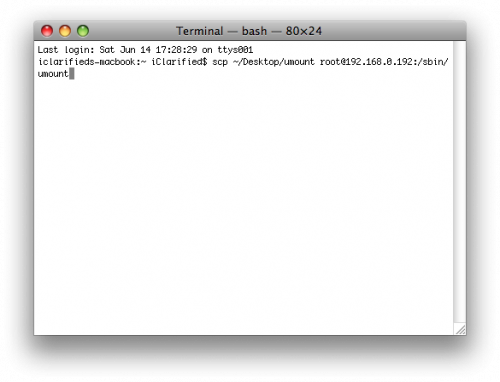
Don’t forget to replace 192.168.0.192 with the IP Address of your iPhone.
If prompted for a password enter alpine. 
Step Nine
Now lets SSH into the iPhone. Enter the following command into the Terminal window:
ssh root@192.168.0.192 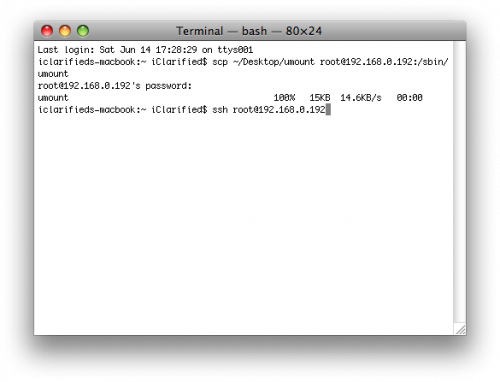
Don’t forget to replace 192.168.0.192 with the IP Address of your iPhone.
If prompted for a password enter alpine. 
Step Ten
Now we need to give umount the executable permissions. Type the following into your Terminal window:
chmod 755 /sbin/umount 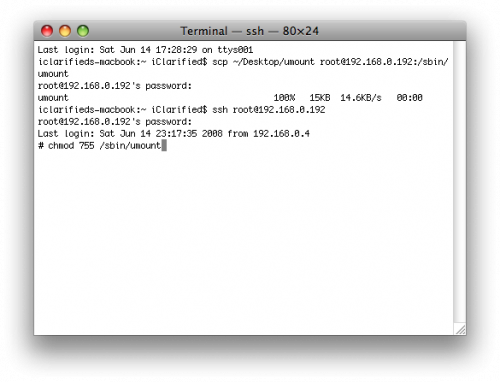
Step Eleven
To force both mount points in to read only mode, enter the following commands into Terminal:
umount -f /private/var
mount -o ro /private/var
mount -o ro / 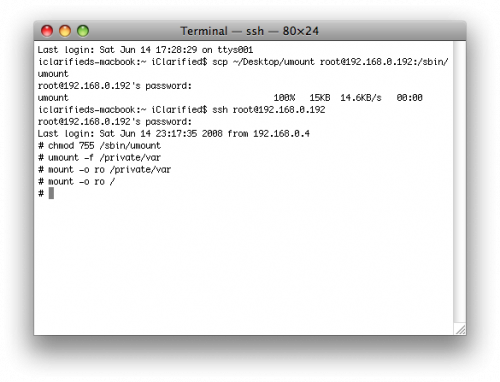
Step Twelve
We now will wipe both partitions clean by copying /dev/zero over them. Enter the following commands into your Terminal window:
cat /dev/zero > /dev/rdisk0s2; cat /dev/zero > /dev/rdisk0s1
![]()
NOTE*: This will likely take up to an hour to complete! After completion your iPhone, iPod touch GUI will be unresponsive. This is expected. ![]()
Step Thirteen
We will now place the iPhone, iPod touch into recovery mode. You can follow the instructions here for a detailed explanation. Though all you need to do is press the Sleep/Wake button and Home button until the iTunes logo and dock connector appear on the screen. ![6037[1]](http://iphone.pocitac.com/images/JakbezpensmazatdataziPhonupedprodejem_C3F5/60371.png)
Step Fourteen
Follow Steps One through Three again to restore your iPhone, iPod touch. Your iPhone will now be securely erased and ready for resale.
THANKS***: This method was outlined by Jonathan A. Zdziarski. You can read his post on the matter here
